Thursday, March 14, 2013

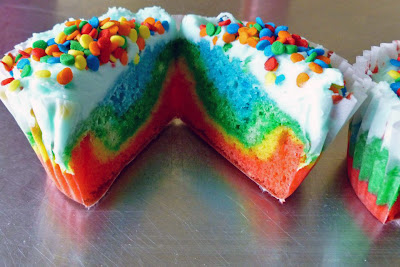
St. Patrick's Day Rainbow Cupcakes


Here's a fun kid project to do for St. Patrick's day, or spring in general.  I bet there are lots of snowy places around the country that could use a little rainbow cupcake magic right about now!


Start with separate but painstakingly equal batters and spoons.  I divided half a batch of yellow cake batter evenly into bowls. The girls stirred in the colors.  Using professional food colors (like these) is a good idea.  They have much more vibrant  colors and are very concentrated.


Painstakingly clean hands, of course.


Next layer: make sure not to stir it into the previous layer.  And so on...


All six colors done!  Perfection not required.


Some sky blue frosting goes on top.


Add some sprinkles, because everybody likes sprinkles.


VOILA!


Friday, February 8, 2013

How to: Marker Art Bnner


I have an amazingly fun (and pretty easy) kid project to share.  It was inspired by a number of different creations I've seen in the blogosphere over the past year that involve permanent markers and rubbing alcohol. You might think that permanent markers would not be the best choice for a kids' project, but actually they're much less messy than paint and easier for little hands to manipulate.

We were making a banner for our church sanctuary, but the same concept can be used with just about any theme and fabric finishing technique.  All you need is: 
  • white 100% cotton fabric
  • permanent markers (like Sharpies)
  • rubbing alcohol
  • a spray bottle and/or small dropper
  • a plastic drop cloth to keep your surfaces clean

Our banner design called for words as the centerpiece for each panel, so I printed them in large, bold font and traced around the outline of each letter in dark pencil before we started decorating with permanent markers.  We tried to avoid the pencil area with the markers, so we would be able to see it easily later.


Then the kids could get to work.  Each of the four panels of our banner was also dedicated to a certain color family, so I pre-sorted the markers and only gave the kids the ones I wanted them to use for each panel. They could draw or write whatever they liked, at whatever angle or scale they wanted.  For our project, the kids tried to draw pictures that were in some way connected to the word theme for each panel.  

This is a great activity for the youngest as well as the oldest kids (ours were 6-13 years old) because there's no "right" way to do it...and it doesn't really matter how great an artist you are anyway.  It's very egalitarian.


Next we took a spray bottle and filled it with the rubbing alcohol.  The fabric panel was laid on top of a plastic drop cloth (actually an old Twister mat), to protect the table underneath.


We sprayed and sprayed, until all of the fabric was saturated with rubbing alcohol and all of the artwork started to bleed together.  The alcohol is doing two different things here.  It's releasing the permanent marker ink and it's pulling (wicking) the moisture to the dry parts of the fabric, bringing the color with it.  For this reason, you can really change the look of your artwork just by spraying the alcohol differently: concentrated in spots, evenly around the whole thing, starting from the inside out, starting from the outside in, etc.  It's fun to experiment.


Once you've sprayed it, you need to let the color spread and dry overnight.  We went through this process several times, each time the white spots filled in more and the colors wandered further into their neighbors' territory.  We did need to add a few swirls and polka dots for a little extra color later in the process in areas where the kids hadn't drawn anything, so that everything was colored.  

We decided to try an additional rubbing alcohol technique later in the process as well.  Using  a pipette, we dripped rubbing alcohol all around the fabric, leaving raindrop-like splashes in the color pattern.  I liked the effect.


Once it's totally dry, you can add fabric paint for any non-bleeding parts of your design.  This is where I painted over the pencil mark outlines to make my letters.


I sewed them all together and added a border and hanging loops.  It now graces our church sanctuary for this Lenten season.  And the church's children are its proud creators!


Saturday, December 1, 2012

How To: Yule Nissen Ornaments


Now that December is here, Christmas decorating can begin in earnest.  Our Christmas tree is always decorated in a traditional Nordic style, with glossy red apple ornaments, straw stars and pinecones, and little red Yule Nissen (Christmas elves).   Another name for these friendly folks is Tomten.  One of our favorite books to read at this time of year is a classic Astrid Lindgren tale called The Tomten and the Fox.  We love it.  We have little Tomten and Nissen all around our house, and decided recently to make some more ourselves to add to the tree and give away as gifts.
What you need:
·         small pinecones--we picked ours this summer on a trip to the ranch
·         wooden beads
·         jute string or yarn--for hair
·         paint, permanent markers or fingernail polish to decorate the eyes
·         felt fabric squares
·         tiny jingle bells
·         scissors
·         glue gun
·         needle & thread

To start, paint a face on your wooden bead.  I used blue nail polish and strung a whole line of beads on a shish kabob skewer to make it easier to hold and dry them.  Next cut your felt fabric into circles, then into quarter circles.  Take one quarter circle and sew the two straight edges together, creating a little cone shape.


Sew tiny jingle bells to the tips to make teeny tiny hats.


Use a hot glue gun to attach a wooden bead face to the stem end of your pinecone. 


Glue hair to the top of the wooden bead face using the hot glue gun.  We tried lots of different styles: braids, long and straight, short and fuzzy.  If you’re using jute twine, you can get a more hair-like effect by unraveling the strands in the twine.  This whole step can actually be done either before or after the face bead gets attached to the pinecone…whichever works best for you. 


Cut long strips of felt fabric and glue them around the “neck” of your nisse as a scarf.  This also, conveniently, covers up any unattractive glue globs that might have developed when you attached the head.
Last, glue a hat on top of your nisse’s head and attach a string for hanging.  If you’ve done this project with kids, I also recommend finding a place where they can attach their name and the date they made the ornament.  I still have Christmas creations that go up on our tree that I made when I was in kindergarten.  It’s great to make memories.


Monday, October 22, 2012

Halloween Shrunken Heads


Shrunken heads will add that extra little something to any Halloween gathering.  A friend took inspiration from Allison DiNatale's idea and did this fun, kid-friendly project for a recent party.

Start with Granny Smith apples, lemon juice & salt.  Peel the apples and cut them in half, removing seeds.  Carve eyes, nose and mouth on the rounded side of each apple, then float in a liquid mixture of 2 cups lemon juice and 2 tablespoons salt.  This keeps the apples from turning brown. 


You might end up with some prune-y fingers that look a little like shrunken parts yourself.


Place the apple faces on a baking sheet in a low heat oven (250 degrees) for 90 minutes, or so.  This dries them out, without burning.


Press some cloves into the "eye sockets" to give them a little extra expressiveness.


And float them in your favorite cider brew to add extra flavor and flair to your Halloween party.


Perfect!


Saturday, October 13, 2012

Urban Unveiled 2012


This week we were fortunate to participate, once again, in the Urban Unveiled wedding show at Benaroya Hall in downtown Seattle.  I spent a long time getting our display ready and am so pleased with how it turned out that I have to share it with you all.  

We were debuting some new products for our custom favor line.  We have whimsical new packaging for our natural lips balms that we're calling "Seattle Sundries' Butterfly Kisses".  I think you can see why.  The fun thing about them is that they are totally customizable: flavor, color, paper style, etc. They are favors that do double duty as decorations.  We also have new little custom favor boxes that hold three small guest soaps...which also can be totally personalized for any event.

We displayed some examples of retro groomsman gift sets that would be perfect for the gentlemen in any wedding party.


See that neat old box in front?  I found that on a visit home to the ranch a few years ago.  It was stuffed with miscellaneous little items, including the ones you see below.  These are the matchbooks, foil paper cutouts, and white swans that were favors for the celebration of my great-grandparents 50th wedding anniversary.  They were married 100 years ago, last month. For real.  I kept the box closed during the show, but the few people who were curious enough to lift the lid got to hear the story of Gunda and Louis' nuptials.


We also had our bath soaps in custom tins on display for folks to sniff and feel.


These were some lovely little clutch purses that I made to show how unique bridesmaid gift sets can be made using our skincare products.  See how the inside fabric on the clutches matches the table skirt?  These were fun to make.  You should try it!


Happily, our space was right next to the charming lady who owns Fiore Blossoms.


Of course, Luly Yang was there.


And the dapper gentlemen from True Colors Events...


There were so many beautiful things to see that I couldn't possibly show them all, but I think this might have been my favorite floral arrangement in the whole place.


The most admired and eye-catching part of our display were the cherry blossom branches that we hung the Butterfly Kisses from.  They were battery operated LED lights that were so easy to arrange and were just perfect for the butterflies.  I highly recommend them for any such displays you make in the future.


Once the sun went down, the lights were dimmed and the candles were lit, it made a most lovely sight.