Thursday, May 23, 2013

Hockey Soap

Probably because of the northern latitudes where I’ve lived, I’ve always preferred the cold-climate sports like skiing and ice skating.  It’s a bit surprising that I never had much of a connection with hockey growing up.  There weren’t any rinks or teams near us in North Idaho, so the sum total of my hockey exposure involved playing pick-up games on a frozen Coeur d’Alene or Fernan lake in the wintertime, using a Stick Up air freshener as a puck.  I always loved it though.  I think if I’d been able to play hockey on a real team, I would have gotten sucked in easily.


A few years ago my son was introduced to hockey through a friend whose parents are expat Canadians.  He was hooked, fast.  It’s been so fun for me to watch him over the past six years as his skating skills and strategy have improved exponentially.  I truly enjoy watching the games.  The sport of hockey takes multitasking to a totally new level.  It’s awesome. 

Hockey does have a downside though.  It stinks.  Literally.   I’m sure that other sweaty sports are the same, but I’m astounded every time I walk near a locker room (or my son’s hockey gear drying out) at just how fragrant it is.  They work hard on the ice, and they produce the sweat to prove it.  I've been thinking for a while that a hockey soap would be a great idea.  Plus, the round shape of my soaps have often been compared to hockey pucks…so the union was clear.   All I needed was a great, beneficial ingredient that turns the soap a deep hockey-puck shade of black.  Activated charcoal was just the thing.  Add to it the refreshing scent of peppermint and tea tree essential oils and you have a winner!   


Saturday, May 18, 2013

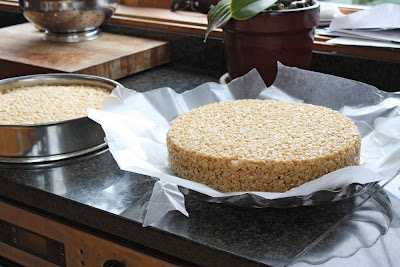
Rice Krispie Treat Surprise Cake


We're not huge cake people in my household.  It's OK, but generally pretty low on the list of favorite desserts.  Rice Krispie Treats, on the other hand, are very high on the list.  This year we decided to try something new for my daughter's birthday "cake".  She didn't tell any of her friends what was on the inside, so they were all very surprised to see that it was a Ginormous Rice Krispie Treat!!


Huge Hit!!


I know I'm not the first person to think of this, but I must admit that we were pretty pleased with the outcome.  


Sunday, April 28, 2013

Butterfly Craft Projects


So, what can you do with the cool butterfly wings from your Butterfly Smooch Stick favors, once the lip balm tube has been removed for use? Don't throw them away!!  My daughters and I came up with a couple of fun craft ideas that would be great for a kids' party.  Just think...you can get the favors and the activity taken care of all at once!

The first technique is probably the easiest.  Just take jumbo craft sticks (the size of tongue depressors), some paint, and adhesive magnet strips .


Cut the craft sticks in half and round out the corners with your scissors, then paint them a dark brown color to match the brown of the butterfly wings.


Once dry, insert the painted craft stick into the slits on the butterfly.


Turn it over and apply your adhesive magnet.  This will help to hold everything in place, so that the wings don't slip around at all.


Add some decoration on the top using 3D "puff paint" and/or little self-adhesive jewels.  You can bend the wings up just a little to make the butterfly look more realistic.  Easy and fun!!  


The other idea takes a little better manual dexterity,  but is also very kid-friendly.  Just take brown chenille pipe cleaners, regular size craft sticks (Popsicle sticks), and little suction cups .


Cut the sticks down to the appropriate size and round out the corners, like you did with the other project.


You can add a little hot glue to hold things in place, if you'd like. 


Wrap your pipe cleaners around the stick to form the body of the butterfly. We used three pipe cleaners for each craft stick.  


You can even make legs.  The pipe cleaners give the body a cute, fuzzy texture.


Slip your butterfly body into the slits on the wings.  If you decided to make legs, you may have to bend them down temporarily in order to slide the whole thing in easily.


You could just leave the butterfly like this to play with, or you could add a suction cup to the bottom so that it can be affixed to things.


Attach your suction cup to the bottom using hot glue.


The butterflies look great attached to windows because the translucence of the vellum paper allows the light to shine through.


 Do you have any other good ideas?  I'd LOVE to hear about them!


Saturday, April 20, 2013

Guess What? ...Chicken Butt


If you live in another part of the country, (or in the countryside, for that matter) you may not be aware of the wildfire that has been sweeping our Northwest urban landscape: backyard chickens.  Keeping city chickens has gotten so popular around these parts that there's actually an advertising campaign that lovingly spoofs it.  

Well, I've been going back and forth in my mind for a few years about the idea of keeping chickens.  We eat LOTS of eggs (2-3 dozen a week), so it makes sense from a practical standpoint.  Also, my son has been pestering us for a pet bird.  Admittedly, he was talking about a parrot, not a chicken, but beggars can't be choosers, right?   On the downside, I've always been somewhat repulsed by fads.  In high school, I would stop wearing my hair a certain way or choosing certain clothes if more than a few people started doing it.  My husband has also been a hard sell in the chicken debate.  

Anyway, after much deliberation and the suggestion that learning all about chicken care would be a great focus for our urban 4-H club, we have decided to take the plunge.  So I introduce to you:


Ginger
(a Speckled Sussex)


Kyriarcho (a Silver Laced Wyandotte) 
The name apparently means "dominant one" in Greek...my son's bird.


Luna
(a Delaware)


Rose or Rosie
(a Red Star)


and Trixie
(a Golden Sex Link)

It's been pointed out to me that all but one of these is a stripper name.  Oh well.  We are looking forward to our great new adventure.  I'll let you know how it goes...


Thursday, March 14, 2013

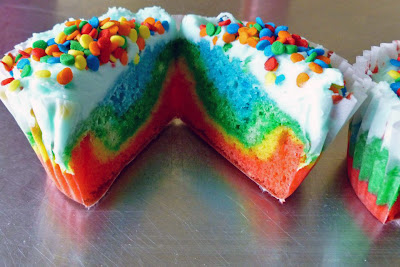
St. Patrick's Day Rainbow Cupcakes


Here's a fun kid project to do for St. Patrick's day, or spring in general.  I bet there are lots of snowy places around the country that could use a little rainbow cupcake magic right about now!


Start with separate but painstakingly equal batters and spoons.  I divided half a batch of yellow cake batter evenly into bowls. The girls stirred in the colors.  Using professional food colors (like these) is a good idea.  They have much more vibrant  colors and are very concentrated.


Painstakingly clean hands, of course.


Next layer: make sure not to stir it into the previous layer.  And so on...


All six colors done!  Perfection not required.


Some sky blue frosting goes on top.


Add some sprinkles, because everybody likes sprinkles.


VOILA!


Friday, February 8, 2013

How to: Marker Art Bnner


I have an amazingly fun (and pretty easy) kid project to share.  It was inspired by a number of different creations I've seen in the blogosphere over the past year that involve permanent markers and rubbing alcohol. You might think that permanent markers would not be the best choice for a kids' project, but actually they're much less messy than paint and easier for little hands to manipulate.

We were making a banner for our church sanctuary, but the same concept can be used with just about any theme and fabric finishing technique.  All you need is: 
  • white 100% cotton fabric
  • permanent markers (like Sharpies)
  • rubbing alcohol
  • a spray bottle and/or small dropper
  • a plastic drop cloth to keep your surfaces clean

Our banner design called for words as the centerpiece for each panel, so I printed them in large, bold font and traced around the outline of each letter in dark pencil before we started decorating with permanent markers.  We tried to avoid the pencil area with the markers, so we would be able to see it easily later.


Then the kids could get to work.  Each of the four panels of our banner was also dedicated to a certain color family, so I pre-sorted the markers and only gave the kids the ones I wanted them to use for each panel. They could draw or write whatever they liked, at whatever angle or scale they wanted.  For our project, the kids tried to draw pictures that were in some way connected to the word theme for each panel.  

This is a great activity for the youngest as well as the oldest kids (ours were 6-13 years old) because there's no "right" way to do it...and it doesn't really matter how great an artist you are anyway.  It's very egalitarian.


Next we took a spray bottle and filled it with the rubbing alcohol.  The fabric panel was laid on top of a plastic drop cloth (actually an old Twister mat), to protect the table underneath.


We sprayed and sprayed, until all of the fabric was saturated with rubbing alcohol and all of the artwork started to bleed together.  The alcohol is doing two different things here.  It's releasing the permanent marker ink and it's pulling (wicking) the moisture to the dry parts of the fabric, bringing the color with it.  For this reason, you can really change the look of your artwork just by spraying the alcohol differently: concentrated in spots, evenly around the whole thing, starting from the inside out, starting from the outside in, etc.  It's fun to experiment.


Once you've sprayed it, you need to let the color spread and dry overnight.  We went through this process several times, each time the white spots filled in more and the colors wandered further into their neighbors' territory.  We did need to add a few swirls and polka dots for a little extra color later in the process in areas where the kids hadn't drawn anything, so that everything was colored.  

We decided to try an additional rubbing alcohol technique later in the process as well.  Using  a pipette, we dripped rubbing alcohol all around the fabric, leaving raindrop-like splashes in the color pattern.  I liked the effect.


Once it's totally dry, you can add fabric paint for any non-bleeding parts of your design.  This is where I painted over the pencil mark outlines to make my letters.


I sewed them all together and added a border and hanging loops.  It now graces our church sanctuary for this Lenten season.  And the church's children are its proud creators!