Monday, April 2, 2012

How To: Batik Dyed Easter Eggs

We decorated Easter eggs yesterday, using the same method that my Mom taught me as a child.  I'm not sure what the name of it would be, probably pysanka, batik or wax relief.  It's basically the same technique that is traditionally used to make intricate Ukrainian Easter eggs, though our style is much more "free form" and abstract.  


Here's what you need: 
  • hard boiled eggs 
  • wax--I used soy wax, but regular paraffin would do.  You could even just melt down old candles that you have lying around.
  • container to melt the wax in
  • wax pen and/or q-tips
  • dye for coloring the eggs--We always add some vinegar too, to help set the color.


Melt your wax on a very low heat.  Simmer is best, or else it might start smoking.  If you get the wax too hot, it flows too quickly out of the pen and you also run the risk of getting burned more easily.


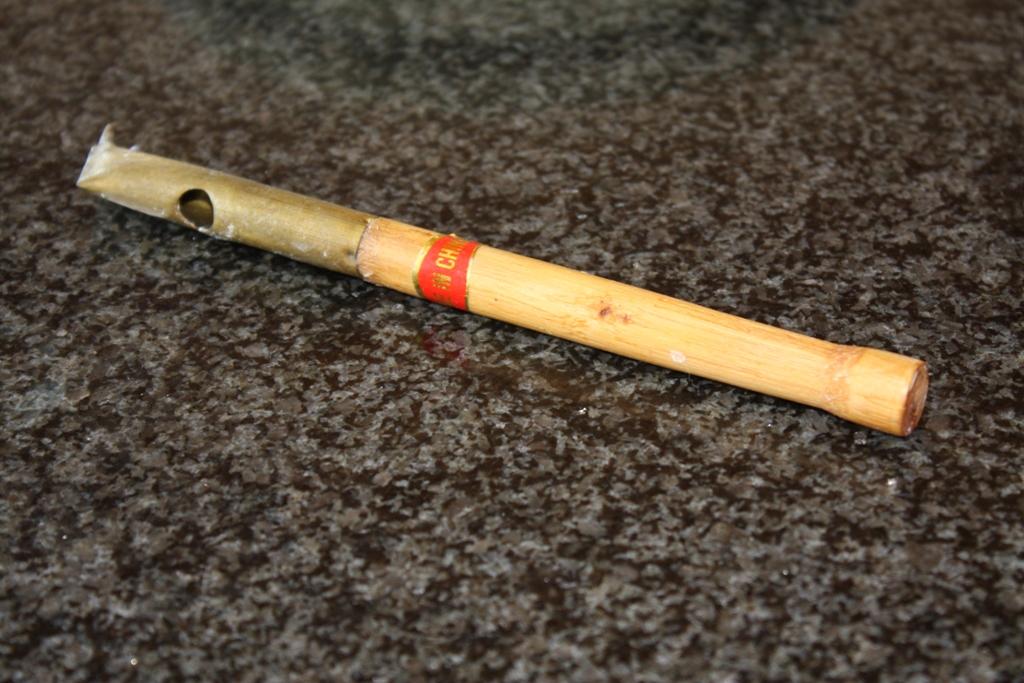
This is what the wax batik pen looks like up close.  It has a little hole and chamber where the melted wax goes in and then pours out of the small hole in the tip.  You don't have as much control as with a regular ink pen, but you can achieve some nice lines and squiggles.

For brighter color contrast, we decided to use white shelled eggs rather than the brown ones that our family typically eats.


To apply the wax, just hold the egg over the wax pot (to catch drips) and "draw" your designs onto the egg.  Be careful of dripping wax onto skin and fingers because it's a little hot...though not as hot as the wax from a burning candle.  We didn't have any wax injuries, thankfully.


The wax cools and hardens in seconds, and you're ready to dip the egg into your color bath.  Every part of the egg the wax touches stays the color that is under the wax.  We usually went through this wax & color dip process two or three times for each egg, making sure to let the dye dry completely in between each step.    


The final step is to use your fingernail to gently scrape off the wax.  You do need to be careful about how hard you push, or else you end up with a few cracked eggs.  I think we lost two out of the 18 that we started with.


Sometimes the coolest effects come from multiple wax applications and color baths.  The end result can be a lovely colorful abstract that reminds me of some sort of Wassily Kandinsky painting.  Part of the fun is not knowing exactly what you're going to end up with until you scrape off the wax.


Happy Easter!

.

Sunday, March 25, 2012

You Dirty Dog!

After many months of planning and recipe tweaking, I'm finally ready to introduce our newest creation:  Dirty Dog Soap!


We've been using it on our own dirty dog, Murdoch.


He LOVES it...see? 


OK...so maybe love isn't exactly the best word, but it makes him smell quite fresh and clean and leaves his coat incredibly soft and fluffy.  He seems to like it a lot once he's out of the bath.


I think there's a trace of a proud smile here.  Perhaps.


Dirty Dog Soap could actually be categorized as a shampoo bar, since it contains natural ingredients like jojoba, coconut and castor oils, which make a wonderfully rich lather and moisturize the hair and skin.  The bar is scented with a pure essential oil blend of peppermint, lemongrass & lavender.  This mixture is fresh and invigorating as well as being severely disliked by bugs and little beasties.  The yellow flecks of color in the bar come from the calendula flower which is often used to heal, soften and sooth dry skin.

I should mention too, that there's absolutely nothing that makes this soap unsuitable for humans.  The ingredients are identical to those found in human shampoo and bath  bars.  The smell is wonderful and the lather sensational.  This is a soap the entire family will love...including the furriest members. 


Saturday, March 24, 2012

How To: Self-Watering Seed Starter Pots


The URL for this post has moved.


You will be automatically redirected in 3 seconds.
Please update your links accordingly.  
Thanks!


Tuesday, March 13, 2012

How To: Rainbow Chain

This weekend was the Daylight Savings switch, which is always hard, and yesterday was a miserably cold and rainy day here in Seattle.  We're all so anxious for spring and sunshine...and rainbows.  St. Patrick's Day is coming up later this week, so it seems like a good time to attract some leprechauns.

This classic kid project is an easy and fun way to add some rainbows to your day.


Start by cutting strips of colored construction paper and laying them out in piles in the order of the colors of the rainbow.


Pour a little white glue into a small dish so that the tips of the paper strips can be dipped into the glue.  It's easier and much less messy for kids to do it this way than to squirt the glue onto the paper.


Once one tip has been dipped in glue the paper can be wrapped into a link in the chain.  Each color should have two links in a row, so that you can see the rainbow pattern from every angle.


Have Fun!

all photos courtesy of Britt McCombs
.

Thursday, February 23, 2012

How To: Glitter Votives

By this time of year I'm always itching for spring to arrive.  The days are starting to get longer, but it's still pretty wintery, gray and dark in our little corner of the world.  Such a situation calls for glitter, clearly.  I wanted to make a pretty votive candle holder for my daughter, since she adds sparkle and light to my life every single day.    Here's what I came up with...


What you need:  
  • glass votives in any size or shape--jelly jars or wine glasses would probably work well too
  • double-sided tape--this should have paper on one side
  • fine glitter--the courser stuff might work too, but would probably not stick to the tape as well
  • scissors
  • dry paint brushes
  • drop cloth or sheet to cover your work surface
  • plain pieces of paper to collect excess glitter
  • clear varnish--optional


    Start with clean, dry glass.  Plan out the design that you want beforehand. It's helpful to apply only one glitter color at a time, both for efficiency and so that the colors don't become blended.  Cut a strip of double sided tape and apply it to the glass (leaving the paper side attached).  Burnish with your fingernail to make sure that the tape is adhered properly.


    Remove the paper backing from the tape and pour ample quantities of glitter onto the newly exposed sticky side of the tape.  You can pat it on with your finger or a dry paintbrush to make sure that it's well distributed and stuck on.


    Shake off the excess glitter and brush lightly with a dry paintbrush to remove any extra that may be attached to the glass.  


    Repeat as needed with all the colors, shapes and patterns that your heart desires.  You could do more interesting variations than we attempted here by using shape blade scissors or shaped hole punches like the kind often used in scrap booking. One optional step (that I did not photograph for this tutorial) is to dab clear varnish over the glitter (but not on the glass) to protect it from being brushed off during normal handling.


    I think I'll call these my "Welcome Back Spring" candles.  I love coming out of the dark of winter and back into the light.  Don't you?

    .

    Saturday, February 11, 2012

    How To: Colorful Heart Crayons

    Here's a cute, fast and easy Valentine's Day project for you to do with the kids this weekend.  These would make great classmate Valentine's gifts for all of the school parties that will be happening on Tuesday, or just a fun little somethin' for your own kids to use in honor of the upcoming holiday.


    Start with a colorful collection of crayons.  The ones shown here are new, but broken bits work great.  It's actually a wonderful way to get more life out of them once they've been rejected by the kids for being too small to hold.  It's totally fine to use and mix different brands of crayons as well.  Be aware that they may well have different melting points though.  The higher the paraffin content, the faster they will melt.


    Remove all of the paper wrappers and break or cut the crayons into small pieces.  Do not grate them, since this would make the colors blend together too much and the end product would not look as vibrant or impressive.  


    Place the crayon pieces in shaped silicone ice cube trays.  I have a huge collection of them in many different shapes which I use for hand soap molds. These heart shapes are perfect for Valentine's Day.  Ikea, Target, Goodwill and Value Village are great sources for silicone molds, by the way.


    Place the crayon pieces in the molds.  It's OK to overfill them a bit, since the crayons will melt and pool downward into the mold.  It looks nice to choose just two or three color families for each heart.


    Put the silicone molds on a baking tray and place them in the oven at 230 degrees for around 15 minutes until all of the crayons have melted.


    Let them cool, then pop them out of the molds.


    Cute and great for chubby little hands!  They're really fun to color with because they make beautiful swirling effects as each of the blended shades makes its own unique mark on the paper...just like your Valentine makes a unique mark on your world.  Sorry, I couldn't resist the sappy comparison.  

    Happy Valentine's Day!

    All photos courtesy of Britt McCombs.

    Friday, February 10, 2012

    The Power of Punctuation

    I LOVE grammar humor.  Happy Friday everyone!